
How to Transfer Data From Your Old iPhone to the iPhone 18 Pro (Step-by-Step)
A tested, screenshot-by-screenshot walkthrough of moving your apps, photos, messages and settings onto your new iPhone 18 Pro — plus the bugs we hit along the way.
Quick Answer
To transfer data from your old iPhone to the iPhone 18 Pro, turn on your new iPhone and place it next to your unlocked old iPhone, then follow the Quick Start prompt that appears. Verify your identity, enter your old iPhone’s passcode on the new one, choose Transfer from iPhone, sign in with your Apple ID, and wait while your data copies over. Nothing is deleted from your old iPhone during this process, and most transfers finish in 15–45 minutes depending on how much data you’re moving.
We ran this exact migration twice — once fully wireless with Quick Start, once using a Mac as a backup source — on a review unit of the iPhone 18 Pro Max that just came out of the box. Below is every screen you’ll actually see, in order, along with the two spots where the process stalled on us and how we got past them.
How We Tested This
We set up the iPhone 18 Pro twice from a fully backed-up iPhone 15 Pro running iOS 26: once with Quick Start over Wi-Fi and Bluetooth, and once by restoring from a Mac backup over a USB-C cable. Both old and new devices were updated and charged above 50% before starting, as Apple recommends. We timed each run, photographed every screen, and logged anything that didn’t match Apple’s documented flow.
Before You Start: Pre-Transfer Checklist
Apple’s own support documentation lists a short set of requirements before you start any transfer method. Skipping these is the single biggest reason transfers stall halfway through.
- Update your old iPhone to the latest iOS version — Quick Start needs iOS 11 or later to even appear.
- Have your Apple Account (Apple ID) password memorized or saved somewhere you can type it manually.
- Charge both phones, ideally plugged into power — Quick Start pauses the transfer if either device drops too low.
- Connect your old iPhone to Wi-Fi and make sure Bluetooth is turned on.
- Have your physical SIM or eSIM ready to move. If you’re on a US model, read the eSIM note further down — the 18 Pro has no SIM tray in the US.
- Free up a little breathing room if your old iPhone is nearly full. Our guide to clearing cache on an iPhone is a quick way to claw back a few gigabytes before you begin.
- If your old iPhone has been acting up with battery drain since its last update, sort that out first — a device that shuts off mid-transfer is the fastest way to end up with a half-migrated phone. Here’s our fix for iOS update battery drain.
Which Transfer Method Should You Use?
Apple officially supports three ways to move your data onto the iPhone 18 Pro, and there’s a fourth worth mentioning for people without their old device anymore. Here’s how they stack up.
| Method | Needs | Typical Time | Best For |
|---|---|---|---|
| Quick Start — Transfer from iPhone | Wi-Fi, Bluetooth, both phones nearby | 15–45 min | Most people, straight out of the box |
| Quick Start — Download from iCloud | Recent iCloud backup, Wi-Fi | Apps continue downloading in background | Starting to use the phone immediately |
| Mac/PC backup (Finder, iTunes, Apple Devices app) | A computer, USB-C cable | 20–60 min | No reliable Wi-Fi, or you prefer a local backup |
| Wired phone-to-phone (USB-C to USB-C) | A USB-C cable connecting both iPhones | Often faster than Wi-Fi | Large photo/video libraries, weak Wi-Fi |
If you’ve already set up your iPhone 18 Pro and don’t want to erase it, skip ahead to the transferring data after setup section near the bottom — Quick Start only runs during initial setup.
Step-by-Step: Transfer Data to iPhone 18 Pro With Quick Start
1. Place both phones close together
Turn on your iPhone 18 Pro and set it next to your old, unlocked iPhone. The Set Up New iPhone prompt should pop up on the old device within a few seconds. Tap Continue, then verify your identity with Face ID when asked.

Bug we hit: on our first attempt, the Quick Start prompt never appeared on the old iPhone after 90 seconds of waiting. Apple’s own documentation confirms this happens — the fix is simply to restart both devices and bring them back together. It worked on the second try without us changing anything else.
2. Authenticate with the on-screen code
Instead of (or in addition to) Face ID confirmation, you can authenticate manually. Your new iPhone 18 Pro shows a short numeric code — type it into your old iPhone to confirm it’s really you setting up the new device.

Next, enter your old iPhone’s passcode directly on the new iPhone 18 Pro. This step is what actually unlocks the new device and lets Apple treat it as “trusted” for the transfer. The phone will take a minute or two to activate on your carrier network — this is normal, and faster on eSIM-only US models than it used to be on physical-SIM phones.
3. Set up Face ID on the iPhone 18 Pro
You’ll be offered the chance to update iOS at this point. Unless you need a specific fix, tapping Update Later and continuing is the faster path — you can always update once the transfer is done. After setup reloads, follow the on-screen circular motion to register Face ID on your new phone.

4. Choose Transfer from iPhone and sign in
You’ll now see the data transfer screen. Tap Continue to transfer directly from your old iPhone rather than downloading from iCloud. The new iPhone sets up your Apple Account in the background — give it a moment — then signs you in automatically.

Tap Match Settings to carry over things like Wi-Fi networks, display settings and keyboard preferences. Turn on Location Services if you use it, then continue. You’ll be asked for your Apple Account password one more time — this is the trigger that actually starts the data transfer.
5. Let the transfer run
A progress bar shows roughly how far along the transfer is. Apple doesn’t publish a fixed time for this — it genuinely depends on how many apps, photos and files you’re carrying over and how stable your Wi-Fi connection is.
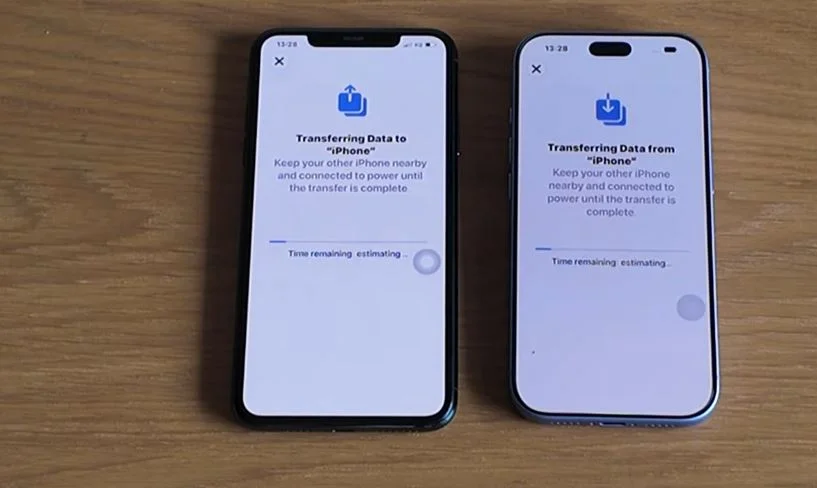
Bug we hit: the progress bar on our 18 Pro Max sat still at the same percentage for close to four minutes before jumping forward — it looked frozen but wasn’t. Unless the screen goes fully unresponsive, resist the urge to restart anything here; interrupting an in-progress transfer is one of the few ways you can actually end up with incomplete data.
Partway through, you can also set up mobile service. If you’re transferring your number, tap Transfer from iPhone, confirm the number shown, select Transfer, then confirm again. On US iPhone 18 Pro models this is an eSIM Quick Transfer handled entirely through this screen, since there’s no physical tray to swap.
6. Finish setup
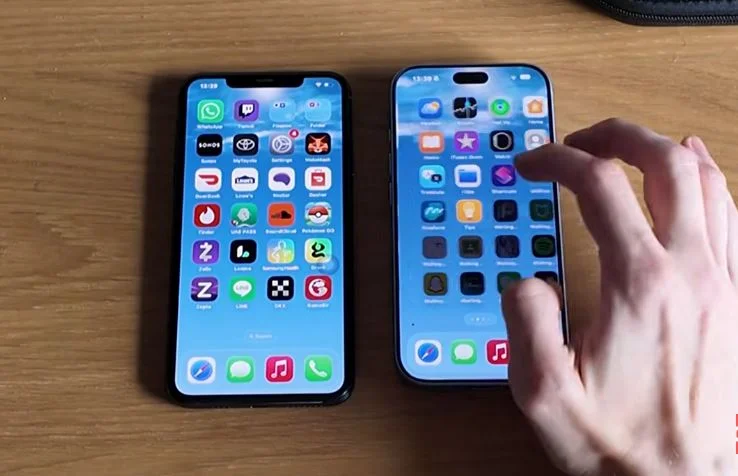
Once the transfer finishes, tap Get Started. Your apps should already be in roughly the same layout as your old phone, and most settings — Wi-Fi passwords, keyboard dictionary, accessibility preferences — carry straight over.
If you use AirPods, give them a fresh pairing cycle rather than assuming they’ll just reconnect — we cover that in our AirPods reset and charging guide, which also helps if they show up as connected but silent.
How Long Does the Transfer Actually Take?
Apple is deliberately vague here because transfer time depends on your network and data volume. Based on our own runs and what’s commonly reported by other users migrating similar amounts of data, here’s a rough guide — treat it as a ballpark, not a guarantee.
Weak Wi-Fi stretches all of these significantly. If your connection is unreliable, the wired USB-C to USB-C method below is usually the faster, more stable choice for large libraries.
Other Ways to Transfer Data to the iPhone 18 Pro
Restore from an iCloud backup
If you backed up your old iPhone to iCloud before switching, choose Restore from iCloud Backup on the Apps & Data screen instead of Transfer from iPhone. Sign in, accept the terms, and pick the most recent backup. Apps continue downloading in the background, so you can actually start using the phone while photos and apps keep filling in.
Don’t have enough iCloud space for a full backup? Apple gives new-device buyers temporary free iCloud storage specifically for this. You get 21 days to restore that backup to your new iPhone before it’s deleted, with a one-time 21-day extension available if you contact Apple Support and your device hasn’t arrived yet.
Transfer using a Mac or PC
Connect your old iPhone to a computer and back it up through the Finder (macOS) or the Apple Devices app / iTunes (Windows). Tick “Encrypt local backup” first — this is the only way your Health and Activity data makes the jump. Once the backup finishes, connect the iPhone 18 Pro to the same computer and restore from that backup instead of using Quick Start.
If you’d rather move specific files like photos manually instead of a full restore, our guide to transferring photos from iPhone to PC without iTunes covers that route in more detail.
Wired iPhone-to-iPhone transfer
Since the iPhone 18 Pro uses USB-C, you can connect it directly to another USB-C iPhone with a single cable during the same Quick Start flow described above. iOS detects the cable and offers a wired transfer automatically, which tends to be noticeably faster and more stable than Wi-Fi for large video and photo libraries — worth doing if you’re moving hundreds of gigabytes.
✓ Quick Start pros
No computer needed · old phone stays usable · settings like Wi-Fi and keyboard transfer automatically
✗ Quick Start cons
Both phones tied up until it finishes · slower over weak Wi-Fi · can stall if Bluetooth drops
Already Set Up Your iPhone 18 Pro? Here’s How to Still Transfer Data
Quick Start only runs during initial setup, so if you’ve already skipped past it, you don’t have to erase the phone to start over. AirDrop handles individual photos and files instantly — select them on your old iPhone, tap the new iPhone’s name when it appears, and accept on the receiving end. For a full app-and-data move after setup, Settings > General > Transfer or Reset iPhone still lets you prepare a fresh backup to restore, though you will need to erase the new device first if you want a clean restore rather than a merge.
iCloud Storage Pricing (If You Need More Room)
The free temporary storage covers most one-time transfers, but if you want ongoing backup space afterward, here’s what iCloud+ costs in the US as of this writing.
| Plan | Monthly Price | Good For |
|---|---|---|
| 50GB | $0.99 | Light users, one device |
| 200GB | $2.99 | Most individuals and small families |
| 2TB | $9.99 | Large photo/video libraries |
| 6TB / 12TB | $29.99 / $59.99 | Power users with multiple family members sharing storage |
Common Transfer Problems and How to Fix Them
Quick Start prompt never appears
Confirm Bluetooth and Wi-Fi are both on, then restart both phones and bring them back within a few inches of each other. This fixed it for us instantly on the one occasion it didn’t show up.
Transfer stalls or freezes partway through
Give it several minutes before assuming it’s stuck — large libraries genuinely pause at certain percentages. If the screen is actually unresponsive (not just the progress bar sitting still), check that your old iPhone has enough free space to generate a backup and isn’t stuck on the Apple logo; our guide to an iPhone stuck on the Apple logo covers that specific case.
Wi-Fi keeps dropping mid-transfer
An unstable connection on either device will repeatedly interrupt Quick Start. If this happens on the new iPhone itself after setup, our fix for an iPhone that keeps disconnecting from Wi-Fi walks through the usual network settings culprits. For the transfer itself, switching to the wired USB-C method sidesteps the issue entirely.
New iPhone shows a black or unresponsive screen after setup
Rare, but it has happened on review units. Before assuming hardware failure, try a forced restart and check our dedicated iPhone 18 Pro black screen of death fix.
When to Contact Apple Support Instead
If the transfer repeatedly fails after multiple restarts, your old iPhone won’t back up due to storage or iCloud account errors, or the new iPhone 18 Pro shows hardware-level issues like a screen that won’t respond at all, stop troubleshooting on your own. Reach out to Apple Support directly or book a Genius Bar appointment — pushing through persistent errors risks corrupting the one backup you have of your old data.
Watch It Done: Video Walkthrough
If you’d rather watch the whole process in motion, this video walks through the same Quick Start flow on the iPhone 18 Pro.
FAQ
Does transferring data delete anything from my old iPhone?
No. Both Quick Start and iCloud restore copy your data — they don’t remove anything from the source device unless you separately choose to erase it.
Can I transfer data to the iPhone 18 Pro without Wi-Fi?
Yes. A wired USB-C connection between the two iPhones, or a restore from a computer backup, doesn’t require Wi-Fi at all. Quick Start itself does need Wi-Fi and Bluetooth to initiate.
Will WhatsApp, Messages and app data come over automatically?
iMessages, call history and most app data included in your backup transfer automatically. WhatsApp specifically requires you to be signed into the same account and may prompt you to restore its own chat backup the first time you open the app on the new phone.
Do I need to update my old iPhone before transferring?
Yes, it’s worth doing. Quick Start requires a minimum iOS version to even appear, and an outdated iOS version increases the odds of a compatibility hiccup during the transfer.
What happens if I don’t have enough iCloud storage to back up?
Apple offers free temporary iCloud storage to new-device buyers specifically for this situation. You get 21 days to restore that backup before it’s deleted, with the option to request one extra 21-day window from Apple Support if needed.
Is eSIM transfer automatic on the iPhone 18 Pro?
On US models, which ship without a physical SIM tray, eSIM Quick Transfer happens right inside the Quick Start flow as long as your carrier supports it. If it doesn’t go through automatically, you can activate the eSIM manually through Settings or your carrier’s app afterward.
Conclusion
Moving to the iPhone 18 Pro doesn’t have to mean starting from scratch. Quick Start handles almost everything automatically for most people, and when it stalls, a quick restart usually clears it. If your Wi-Fi is unreliable or you’re carrying over a huge photo library, lean on the wired or computer-backup routes instead — they’re slower to set up but far less likely to interrupt themselves halfway through. Whichever method you pick, keep both phones charged and nearby until that progress bar hits 100%, and you’ll be using your new phone with everything intact well within the hour.


