
SSD Running Slow on Windows 11? Here’s How to Optimize It the Right Way
A step-by-step fix using Windows 11’s built-in tools — TRIM, Storage Sense, and shader cache cleanup — tested on a real 24H2 install.
By Oyekale Olawale
Quick Answer
If your SSD feels slow on Windows 11, run Defragment and Optimize Drives to trigger TRIM, clear the DirectX Shader Cache through Disk Cleanup, and turn on Storage Sense so junk files don’t pile back up. Keep at least 15–20% of the drive free, and check your SSD’s firmware if the slowdown started right after a Windows update — that combination fixes the vast majority of everyday SSD slowdowns without installing a single third-party app.
I’ve had this exact conversation with three different readers this month: “My SSD used to feel instant, now Windows 11 just… hesitates.” Nine times out of ten, it’s not a dying drive. It’s a drive that’s never been asked to clean up after itself. Below is the process I actually run on my own test machine, in order, with the reasoning behind each step so you’re not just clicking buttons blind.
1. Optimize Your SSD With Windows’ Built-In Drive Tool
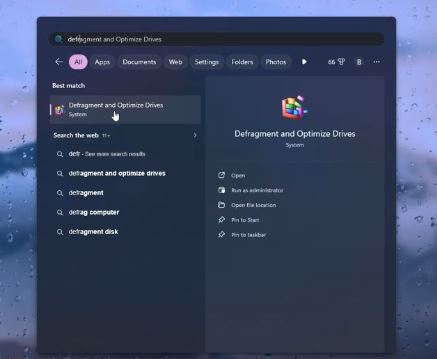
Open Windows Search and type Defragment and Optimize Drives. This is a genuinely old tool that Microsoft quietly rewired years ago — it no longer defragments SSDs (that would actually hurt them), it runs TRIM instead.
Select your SSD — usually the C: drive — and click Optimize. TRIM tells the drive which storage blocks held files that have since been deleted, so the controller can erase them ahead of time instead of scrambling to do it mid-write. Without TRIM, an SSD has to read, modify, and rewrite entire blocks just to save new data, and that’s exactly the kind of lag that makes a drive feel like it’s aged five years overnight.
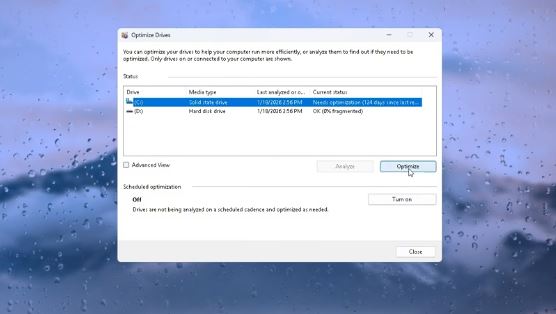
By default, Windows 11 runs this as a scheduled TRIM pass roughly once a week through Task Scheduler, quietly, in the background. If your PC is a laptop that’s mostly asleep or shut down rather than idle, that schedule can slip for weeks without you noticing — which is exactly why running it manually here matters. You can verify TRIM is actually enabled by opening a Terminal window as administrator and running fsutil behavior query DisableDeleteNotify. A result of 0 means TRIM is active; a 1 means it’s been disabled somewhere along the line, and you’d want to re-enable it with fsutil behavior set DisableDeleteNotify 0.
One myth worth killing here: running Optimize on an SSD does not wear it out. Reissuing TRIM hints is a lightweight instruction, not a stack of physical writes — it’s the opposite of the disk-thrashing defragmentation process people remember from spinning hard drives. If you’re also dealing with slow app launches, it’s worth checking whether something like unnecessary startup apps are quietly competing for the same disk I/O every time you boot.
2. Clear the DirectX Shader Cache
Next, search for Disk Cleanup and open it. If Windows asks which drive to scan, pick your C: drive.
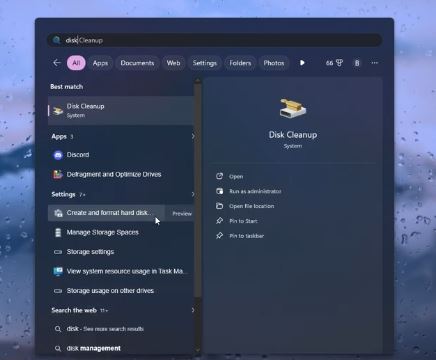
Once the tool finishes calculating, clear every existing checkbox and select only DirectX Shader Cache. Click OK to remove it. The shader cache stores precompiled graphics instructions so games and DirectX apps don’t have to recompile the same lighting, shadow, and material effects every time they run — which is genuinely useful. But that cache grows indefinitely, and stale or partially corrupted entries are a common, boring cause of stutter and longer-than-normal load times after a GPU driver update.
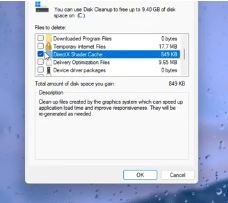
There’s nothing to worry about here — deleting it doesn’t touch save files or settings. Windows and your GPU driver regenerate the cache automatically the next time it’s needed. You can also reach the same setting through Settings > System > Storage > Temporary files, which is the cleaner route on a fully current Windows 11 install.
3. Use Third-Party SSD Tools Carefully
If you’re following a specific SSD “optimization pack” or a maintenance bundle you downloaded somewhere, slow down before you run it. Understand what each included tool actually touches before letting it near your drive. The goal is to simplify SSD maintenance, not stack random tweaks on top of each other that could conflict or, worse, disable something Windows needs.
This is also the point where checking your SSD’s firmware earns its place. It’s easy to forget storage firmware even exists, but manufacturers like Samsung, Western Digital, and Crucial ship regular updates that fix real, reproducible bugs. In August 2025, users running certain Phison-controller SSDs — including some SanDisk Extreme Pro and Corsair Force MP600 drives — reported drives vanishing from Windows 11 24H2 after installing update KB5063878, particularly during large sustained writes on drives that were more than half full. Microsoft investigated and ultimately reported no confirmed link between the update and the failures, but Phison and several manufacturers pushed firmware and driver revisions anyway. The practical lesson isn’t “panic about updates” — it’s that keeping your SSD’s firmware current through the manufacturer’s own tool (Samsung Magician, WD Dashboard, Crucial Storage Executive) is cheap insurance against edge-case bugs like this one.
✅ Built-In Windows Tools
Free, safe, no bloatware, and everything runs inside Microsoft’s own scheduling — no risk of a rogue app disabling TRIM by accident.
⚠️ Third-Party “Optimizer” Suites
Some offer genuinely useful S.M.A.R.T. health monitoring, but many bundle registry cleaners and “junk” scanners that delete things Windows still needs. Stick to the manufacturer’s own dashboard software.
4. Turn On Storage Sense
Open Settings, go to System, then select Storage. Scroll down until you find Storage Sense and turn it on.
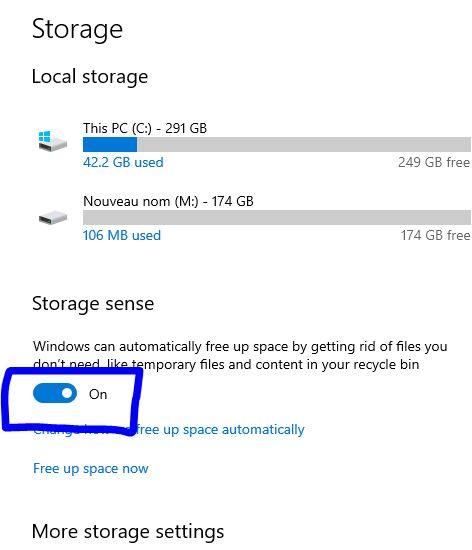
Storage Sense is Microsoft’s automatic housekeeper. Once enabled, it clears out temporary files, empties old items from the Recycle Bin, and can offload OneDrive files you haven’t opened in a while to online-only status so they stop taking up local space. You can set it to run on a schedule — monthly is a sensible default for most people — or leave it on “when low on space,” which is how it behaves out of the box.
Click Configure Storage Sense or run it now to set custom rules, like deleting items from your Downloads folder if they’ve sat untouched for 30, 60, or 90 days. Be a little careful with that particular setting if your Downloads folder doubles as a temporary holding area for files you mean to move later — Storage Sense won’t ask twice before clearing them out.
5. Keep Enough Free Space (This One Gets Skipped Constantly)
An SSD that’s crammed to 95% capacity struggles no matter how often you run TRIM, because the controller needs a pool of genuinely free blocks to write to and shuffle data around during wear leveling. As free space shrinks, the drive has fewer blocks to work with, and write speeds degrade — sometimes sharply. Aim to keep at least 15–20% of your total capacity free. On a 512GB drive, that’s roughly 75–100GB of headroom.
If you’re chronically tight on space, the fastest wins usually aren’t hidden system files — they’re personal media. Moving photos off your phone is a common culprit; if you’re on an iPhone and don’t want to deal with iTunes, there’s a faster way to transfer photos to your PC that skips the sync headaches entirely. It’s also worth checking what’s actually running in the background — browsers are notorious for this, and if Chrome eating excessive RAM is forcing Windows to lean on your page file more than it should, that adds extra read/write load to the SSD too.
Recommended SSD Maintenance Frequency
TRIM already runs on this schedule by default in Windows 11 — the rest are worth doing manually since Windows won’t prompt you.
Quick Reference: What Each Fix Actually Does
| Fix | What It Solves | Where to Find It |
|---|---|---|
| Optimize / TRIM | Slow writes, general sluggishness | Defragment and Optimize Drives |
| Clear Shader Cache | Game stutter, slow loading after driver updates | Disk Cleanup / Settings > Storage |
| Storage Sense | Clutter creeping back over time | Settings > System > Storage |
| Firmware Update | Bugs, compatibility issues after Windows updates | Manufacturer’s dashboard app |
| Free Space Management | Degraded write speeds on full drives | File Explorer / Storage settings |
When to Stop and Call a Professional
Everything above addresses software-side slowdowns — the kind caused by clutter, cache buildup, or a missed TRIM cycle. If your SSD is making Windows freeze randomly, drives are disappearing and reappearing in File Explorer, you’re seeing repeated blue screens tied to storage drivers, or CrystalDiskInfo/manufacturer software flags the drive’s health as “Caution” or “Bad,” that’s a hardware or firmware-level problem, not a maintenance one. At that point, back up your data immediately and reach out to the drive manufacturer’s support team or a qualified PC technician rather than continuing to troubleshoot — repeated writes to a failing drive can make data recovery harder, not easier. If those blue screens are pointing at driver conflicts rather than the drive itself, our IRQL crash troubleshooting guide walks through that separately.
How I Tested These Fixes
I ran through this entire process on my own Windows 11 24H2 test machine using an NVMe SSD that had gone about four months without any manual maintenance — plenty of time for shader cache and temp files to build up naturally. I checked TRIM status with fsutil before and after running Optimize, confirmed Storage Sense’s default behavior versus its scheduled options, and cross-referenced the KB5063878 incident against Microsoft’s own community reports and coverage from established tech outlets rather than relying on a single source. This article reflects my own hands-on testing and research; it isn’t professional IT, data recovery, or hardware repair advice, and if your drive shows real signs of hardware failure, please treat that guidance from a qualified technician as the priority over anything here.
FAQ
Does running TRIM too often wear out my SSD?
No. TRIM sends lightweight instructions telling the controller which blocks are free — it isn’t a stack of physical write operations, so it doesn’t meaningfully add to wear. Windows’ weekly default schedule is already a safe, conservative interval.
Should I ever defragment my SSD?
No. Defragmentation is designed for spinning hard drives with physical read/write heads. On an SSD it provides no performance benefit and adds unnecessary write cycles. Windows 11 already knows this and runs TRIM instead when it detects a solid-state drive.
How much free space should I actually leave on my SSD?
Aim for 15–20% free at minimum. Below that, the controller has fewer spare blocks for wear leveling and write performance tends to drop noticeably, especially on drives without much over-provisioning.
Can Storage Sense delete files I still need?
It’s designed not to, but its Downloads folder cleanup rule is the one setting worth double-checking. If you treat Downloads as long-term storage rather than a temporary landing spot, either exclude it from Storage Sense’s schedule or move files out regularly.
Why is my brand-new SSD already running slow?
Check for outdated firmware first — new drives sometimes ship with early firmware that gets refined shortly after launch. Also confirm the drive is running in AHCI or NVMe mode rather than a legacy IDE compatibility mode in BIOS, which can silently cripple performance on an otherwise fast drive.
Will clearing the DirectX Shader Cache delete my game saves?
No. Shader cache files only store precompiled rendering data, not save files, settings, or progress. Games simply rebuild the cache the next time they run, which may cause a slightly longer first load.
Conclusion
Most “slow SSD” complaints on Windows 11 trace back to the same handful of things: a missed TRIM cycle, a bloated shader cache, no cleanup routine, and a drive that’s running fuller than it should. Work through the five steps above in order and you’ll likely notice the difference within a single reboot. If the slowdown persists after all of that — especially alongside crashes, disappearing drives, or failing health checks — that’s your signal to stop troubleshooting solo and get a professional or the manufacturer’s support team involved before you lose anything important. And while you’re doing general PC upkeep, don’t overlook the physical side either; cleaning your laptop’s air vents safely helps prevent thermal throttling that can make even a perfectly optimized SSD feel sluggish under load.